
| Purchase | Copyright © 2002 Paul Sheer. Click here for copying permissions. | Home |
|
|
| |
Physical disks are divided into partitions. [See /dev/hd?? under Section 18.4.] Information as to how the disk is partitioned up is stored in a partition table, which is a small area of the disk separate from the partitions themselves.
The physical drive itself usually comprises several actual disks of which both sides are used. The sides are labelled 0, 1, 2, 3, and so on, and are also called heads because one magnetic head per side does the actual reading and writing. Each side/head has tracks, and each track is divided into segments called sectors. Each sector typically holds 512 bytes. The total amount of space on the drive in bytes is therefore:
512 x (sectors-per-track) x (tracks-per-side) x (number-of-sides)
A single track and all the tracks of the same diameter (on all the sides) are called a cylinder. Disks are normally talked about in terms of ``cylinders and sectors'' instead of ``sides, tracks, and sectors.'' Partitions are (usually) divided along cylinder boundaries. Hence, disks do not have arbitrarily sized partitions; rather, the size of the partition is usually a multiple of the amount of data held in a single cylinder. Partitions therefore have a definite inner and outer diameter. Figure 19.1 illustrates the layout of a hard disk.
The system above is quite straightforward except for the curious limitation that partition tables have only 10 bits in which to store the partition's cylinder offset. This means that no disk can have more than 1024 cylinders. This limitation was overcome by multiplying up the number of heads in software to reduce the number of cylinders, [Called LBA (Large Block Addressing) mode.]hence portraying a disk of impossible proportions. The user, however, need never be concerned that the physical disk is completely otherwise.
The partition table has room for only four partitions. For more partitions, one of these four partitions can be divided into many smaller partitions, called logical partitions. The original four are then called primary partitions. If a primary partition is subdivided in this way, it is known as an extended primary or extended partition. Typically, the first primary partition will be small ( /dev/hda1, say). The second primary partition will fill the rest of the disk as an extended partition ( /dev/hda2, say). In this case, the entries in the partition table of /dev/hda3 and /dev/hda4 will be blank. The extended partition can be subdivided repeatedly to give /dev/hda5, /dev/hda6, and so on.
A new disk has no partition information. Typing fdisk will start an interactive partitioning utility. The command
|
fdisk /dev/hda |
fdisks your primary master.
What follows is an example of the partitioning of a new hard drive. Most distributions these days have a simpler graphical system for creating partitions, so using fdisk will not be necessary at installation time. However, adding a new drive or transferring/copying a LINUX system to new hardware will require partitioning.
On UNIX, each partition has its own directory. Files under one directory might be stored on a different disk or a different partition to files in another directory. Typically, the /var directory (and all subdirectories beneath it) is stored on a different partition from the /usr directory (and all subdirectories beneath it).
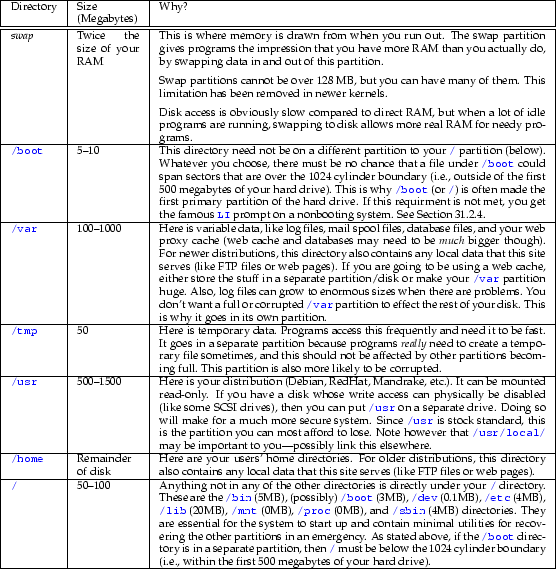
Table 19.2 offers a general guideline as to how a server machine should be set up (with home computers, you can be far more liberal--most home PCs can do with merely a swap and / partition.). When you install a new server, your distribution should allow you to customize your partitions to match this table.
If another operating system is already installed in the first partition, you can type p and might see:
5 |
Command (m for help): p Disk /dev/hda: 255 heads, 63 sectors, 788 cylindersUnits = cylinders of 16065 * 512 bytes Device Boot Start End Blocks Id System/dev/hda1 1 312 2506108+ c Win95 FAT32 (LBA) |
In such a case, you can just start adding further partitions.
The exact same procedure applies in the case of SCSI drives. The only difference is that /dev/hd? changes to /dev/sd?. (See Chapter 42 for SCSI device driver information.)
Here is a partitioning session with fdisk:
5 |
[root@cericon /root]# fdisk /dev/hdaDevice contains neither a valid DOS partition table, nor Sun or SGI disklabelBuilding a new DOS disklabel. Changes will remain in memory only,until you decide to write them. After that, of course, the previouscontent won't be recoverable. |
First, we use the p option to print current partitions--
5 |
Command (m for help): p Disk /dev/hda: 255 heads, 63 sectors, 788 cylindersUnits = cylinders of 16065 * 512 bytes Device Boot Start End Blocks Id System |
--of which there are clearly none. Now n lets us add a new partition:
5 |
Command (m for help): nCommand action e extended p primary partition (1-4)p |
We want to define the first physical partition starting at the first cylinder:
|
Partition number (1-4): 1First cylinder (1-788, default 1): 1 |
We would like an 80-megabyte partition. fdisk calculates the last cylinder automatically with:
|
Last cylinder or +size or +sizeM or +sizeK (1-788, default 788): +80M |
Our next new partition will span the rest of the disk and will be an extended partition:
5 |
Command (m for help): nCommand action e extended p primary partition (1-4)ePartition number (1-4): 2First cylinder (12-788, default 12): 12Last cylinder or +size or +sizeM or +sizeK (12-788, default 788): 788 |
Our remaining logical partitions fit within the extended partition:
5 10 15 20 25 30 35 40 |
Command (m for help): nCommand action l logical (5 or over) p primary partition (1-4)lFirst cylinder (12-788, default 12): 12Last cylinder or +size or +sizeM or +sizeK (12-788, default 788): +64M Command (m for help): nCommand action l logical (5 or over) p primary partition (1-4)lFirst cylinder (21-788, default 21): 21Last cylinder or +size or +sizeM or +sizeK (21-788, default 788): +100M Command (m for help): nCommand action l logical (5 or over) p primary partition (1-4)lFirst cylinder (34-788, default 34): 34Last cylinder or +size or +sizeM or +sizeK (34-788, default 788): +200M Command (m for help): nCommand action l logical (5 or over) p primary partition (1-4)lFirst cylinder (60-788, default 60): 60Last cylinder or +size or +sizeM or +sizeK (60-788, default 788): +1500M Command (m for help): nCommand action l logical (5 or over) p primary partition (1-4)lFirst cylinder (252-788, default 252): 252Last cylinder or +size or +sizeM or +sizeK (252-788, default 788): 788 |
The default partition type is a single byte that the operating system will look at to determine what kind of file system is stored there. Entering l lists all known types:
5 10 |
Command (m for help): l 0 Empty 16 Hidden FAT16 61 SpeedStor a6 OpenBSD [...] 8 AIX 4d QNX4.x 82 Linux swap db CP/M / CTOS / . 9 AIX bootable 4e QNX4.x 2nd part 83 Linux e1 DOS access [...]12 Compaq diagnost 56 Golden Bow a5 BSD/386 ff BBT 14 Hidden FAT16 <3 5c Priam Edisk |
fdisk will set the type to Linux by default. We only need to explicitly set the type of the swap partition:
5 |
Command (m for help): tPartition number (1-9): 5Hex code (type L to list codes): 82Changed system type of partition 5 to 82 (Linux swap) |
Now we need to set the boot able flag on the first partition, since BIOS's will not boot a disk without at least one bootable partition:
|
Command (m for help): aPartition number (1-10): 1 |
Displaying our results gives:
5 10 |
Command (m for help): p Disk /dev/hda: 255 heads, 63 sectors, 788 cylindersUnits = cylinders of 16065 * 512 bytes Device Boot Start End Blocks Id System/dev/hda1 * 1 11 88326 83 Linux/dev/hda2 12 788 6241252+ 5 Extended/dev/hda5 12 20 72261 82 Linux swap/dev/hda6 21 33 104391 83 Linux/dev/hda7 34 59 208813+ 83 Linux/dev/hda8 60 251 1542208+ 83 Linux/dev/hda9 252 788 4313421 83 Linux |
At this point, nothing has been committed to disk. We write it as follows (Note: this step is irreversible):
5 |
Command (m for help): wThe partition table has been altered! Calling ioctl() to re-read partition table.Syncing disks. WARNING: If you have created or modified any DOS 6.xpartitions, please see the fdisk manual page for additionalinformation. |
Even having written the partition, fdisk may give a warning that the kernel does not know about the new partitions. This happens if the disk is already in use. In this case, you will need to reboot. For the above partition, the kernel will give the following information at boot time:
|
Partition check: hda: hda1 hda2 < hda5 hda6 hda7 hda8 hda9 > |
The < ... > shows that partition hda2 is extended and is subdivided into five smaller partitions.
Disk drives are usually read in blocks of 1024 bytes (two sectors). From the point of view of anyone accessing the device, blocks are stored consecutively--there is no need to think about cylinders or heads--so that any program can read the disk as though it were a linear tape. Try
|
less /dev/hda1less -f /dev/hda1 |
Now a complex directory structure with many files of arbitrary size needs to be stored in this contiguous partition. This poses the problem of what to do with a file that gets deleted and leaves a data ``hole'' in the partition, or a file that has to be split into parts because there is no single contiguous space big enough to hold it. Files also have to be indexed in such a way that they can be found quickly (consider that there can easily be 10,000 files on a system). UNIX's symbolic/hard links and devices files also have to be stored.
To cope with this complexity, operating systems have a format for storing files called the file system ( fs). Like MS-DOS with its FAT file system or Windows with its FAT32 file system, LINUX has a file system called the 2nd extended file system, or ext2.
Whereas ext2 is the traditional native LINUX file system, three other native file systems have recently become available: SGI's XFS file system, the ext3fs file system, and the reiserfs file system. These three support fast and reliable recovery in the event of a power failure, using a feature called journaling. A journaling file system prewrites disk alterations to a separate log to facilitate recovery if the file system reaches an incoherent state. (See Section 19.5.)
To create a file system on a blank partition, use the command mkfs (or one of its variants). To create a LINUX ext2 file system on the first partition of the primary master run:
|
mkfs -t ext2 -c /dev/hda1 |
or, alternatively
|
mke2fs -c /dev/hda1 |
The -c option means to check for bad blocks by reading through the entire disk first. This is a read-only check and causes unreadable blocks to be flagged as such and not be used. To do a full read-write check, use the badblocks command. This command writes to and verifies every bit in that partition. Although the -c option should always be used on a new disk, doing a full read-write test is probably pedantic. For the above partition, this test would be:
|
badblocks -o blocks-list.txt -s -w /dev/hda1 88326mke2fs -l blocks-list.txt /dev/hda1 |
After running mke2fs, we will find that
|
dd if=/dev/hda1 count=8 bs=1024 | file - |
gives Linux/i386 ext2 filesystem.
New kinds of removable devices are being released all the time. Whatever the device, the same formatting procedure is used. Most are IDE compatible, which means you can access them through /dev/hd?.
The following examples are a parallel port IDE disk drive, a parallel port ATAPI CD-ROM drive, a parallel port ATAPI disk drive, and your ``A:'' floppy drive, respectively:
|
mke2fs -c /dev/pda1mke2fs -c /dev/pcd0mke2fs -c /dev/pf0mke2fs -c /dev/fd0 |
Actually, using an ext2 file system on a floppy drive wastes a lot of space. Rather, use an MS-DOS file system, which has less overhead and can be read by anyone (see Section 19.3.4).
You often will not want to be bothered with partitioning a device that is only going to have one partition anyway. In this case, you can use the whole disk as one partition. An example is a removable IDE drive as a primary slave [LS120 disks and Jazz drives as well as removable IDE brackets are commercial examples.]:
|
mke2fs -c /dev/hdb |
Accessing files on MS-DOS/Windows floppies is explained in Section 4.16. The command mformat A: will format a floppy, but this command merely initializes the file system; it does not check for bad blocks or do the low-level formatting necessary to reformat floppies to odd storage sizes.
A command, called superformat, from the fdutils package [You may have to find this package on the Internet. See Chapter 24 for how to compile and install source packages.] formats a floppy in any way that you like. A more common (but less thorough) command is fdformat from the util-linux package. It verifies that each track is working properly and compensates for variations between the mechanics of different floppy drives. To format a 3.5-inch 1440-KB, 1680-KB, or 1920-KB floppy, respectively, run:
5 |
cd /dev./MAKEDEV -v fd0superformat /dev/fd0H1440superformat /dev/fd0H1690superformat /dev/fd0H1920 |
Note that these are ``long file name'' floppies (VFAT), not old 13-character-filename MS-DOS floppies.
Most users would have only ever used a 3.5-inch floppy as a ``1.44 MB'' floppy. In fact, the disk media and magnetic head can write much more densely than this specification, allowing 24 sectors per track to be stored instead of the usual 18. This is why there is more than one device file for the same drive. Some inferior disks will, however, give errors when trying to format that densely-- superformat will show errors when this happens.
See Table 18.1 on page ![[*]](crossref.png) for
the naming conventions of floppy devices, and their many respective formats.
for
the naming conventions of floppy devices, and their many respective formats.
The mkswap command formats a partition to be used as a swap device. For our disk,
|
mkswap -c /dev/hda5 |
-c has the same meaning as previously--to check for bad blocks.
Once the partition is formatted, the kernel can be signalled to use that partition as a swap partition with
|
swapon /dev/hda5 |
and to stop usage,
|
swapoff /dev/hda5 |
Swap partitions cannot be larger than 128 MB, although you can have as many of them as you like. You can swapon many different partitions simultaneously.
The question of how to access files on an arbitrary disk (without C:, D:, etc., notation, of course) is answered here.
In UNIX, there is only one root file system that spans many disks. Different directories may actually exist on a different physical disk.
| To bind a directory to a physical device (like a partition or a CD-ROM) so that the device's file system can be read is called mounting the device. |
The mount command is used as follows:
|
mount [-t <fstype>] [-o <option>] <device> <directory>umount [-f] [<device>|<directory>] |
The -t option specifies the kind of file system, and can often be omitted since LINUX can autodetect most file systems. <fstype> can be one of adfs, affs, autofs, coda, coherent, devpts, efs, ext2, hfs, hpfs, iso9660, minix, msdos, ncpfs, nfs, ntfs, proc, qnx4, romfs, smbfs, sysv, ufs, umsdos, vfat, xenix, or xiafs. The most common file systems are discussed below. The -o option is not usually used. See mount(8) for all possible options.
Put your distribution CD-ROM disk into your CD-ROM drive and mount it with
|
ls /mnt/cdrommount -t iso9660 -o ro /dev/hdb /mnt/cdrom |
(Your CD-ROM might be /dev/hdc or /dev/hdd, however--in this case you should make a soft link /dev/cdrom pointing to the correct device. Your distribution may also prefer /cdrom over /mnt/cdrom.) Now cd to your /mnt/cdrom directory. You will notice that it is no longer empty, but ``contains'' the CD-ROM's files. What is happening is that the kernel is redirecting all lookups from the directory /mnt/cdrom to read from the CD-ROM disk. You can browse around these files as though they were already copied onto your hard drive. This is one of the things that makes UNIX cool.
When you are finished with the CD-ROM unmount it with
|
umount /dev/hdbeject /dev/hdb |
Instead of using mtools, you could mount the floppy disk with
|
mkdir /mnt/floppymount -t vfat /dev/fd0 /mnt/floppy |
or, for older MS-DOS floppies, use
|
mkdir /mnt/floppymount -t msdos /dev/fd0 /mnt/floppy |
Before you eject the floppy, it is essential to run
|
umount /dev/fd0 |
in order that cached data is committed to the disk. Failing to umount a floppy before ejecting will probably corrupt its file system.
Mounting a Windows partition can also be done with the vfat file system, and NT partitions (read-only) with the ntfs file system. VAT32 is also supported (and autodetected). For example,
|
mkdir /windowsmount -t vfat /dev/hda1 /windowsmkdir /ntmount -t ntfs /dev/hda2 /nt |
fsck stands for file system check. fsck scans the file system, reporting and fixing errors. Errors would normally occur only if the kernel halted before the file system was umounted. In this case, it may have been in the middle of a write operation which left the file system in an incoherent state. This usually happens because of a power failure. The file system is then said to be unclean.
fsck is used as follows:
|
fsck [-V] [-a] [-t <fstype>] <device> |
-V means to produce verbose output. -a means to check the file system noninteractively--meaning to not ask the user before trying to make any repairs.
Here is what you would normally do with LINUX if you don't know a whole lot about the ext2 file system:
|
fsck -a -t ext2 /dev/hda1 |
although you can omit the -t option because LINUX autodetects the file system. Note that you should not run fsck on a mounted file system. In exceptional circumstances it is permissible to run fsck on a file system that has been mounted read-only.
fsck actually just runs a program specific to that file system. In the case of ext2, the command e2fsck (also known as fsck.ext2) is run. See e2fsck(8) for exhaustive details.
During an interactive check (without the -a option, or with the -r option--the default), various questions may be asked of you, as regards fixing and saving things. It's best to save stuff if you aren't sure; it will be placed in the lost+found directory below the root directory of the particular device. In the example system further below, there would exist the directories /lost+found, /home/lost+found, /var/lost+found, /usr/lost+found, etc. After doing a check on, say, /dev/hda9, list the /home/lost+found directory and delete what you think you don't need. These will usually be temporary files and log files (files that change often). It's rare to lose important files because of an unclean shutdown.
Just read Section 19.5 again and run fsck on the file system that reported the error.
Manual mounts are explained above for new and removable disks. It is, of course necessary for file systems to be automatically mounted at boot time. What gets mounted and how is specified in the configuration file /etc/fstab.
/etc/fstab will usually look something like this for the disk we partitioned above:
5 10 |
/dev/hda1 / ext2 defaults 1 1/dev/hda6 /tmp ext2 defaults 1 2/dev/hda7 /var ext2 defaults 1 2/dev/hda8 /usr ext2 defaults 1 2/dev/hda9 /home ext2 defaults 1 2/dev/hda5 swap swap defaults 0 0/dev/fd0 /mnt/floppy auto noauto,user 0 0/dev/cdrom /mnt/cdrom iso9660 noauto,ro,user 0 0none /proc proc defaults 0 0none /dev/pts devpts mode=0622 0 0 |
For the moment we are interested in the first six lines only. The first three fields (columns) dictate the partition, the directory where it is to be mounted, and the file system type, respectively. The fourth field gives options (the -o option to mount).
The fifth field tells whether the file system contains real files. The field is used by the dump command to decide if it should be backed up. This is not commonly used.
The last field tells the order in which an fsck should be done on the partitions. The / partition should come first with a 1, and all other partitions should come directly after. Placing 2's everywhere else ensures that partitions on different disks can be checked in parallel, which speeds things up slightly at boot time.
The floppy and cdrom entries enable you to use an abbreviated form of the mount command. mount will just look up the corresponding directory and file system type from /etc/fstab. Try
|
mount /dev/cdrom |
These entries also have the user option, which allows ordinary users to mount these devices. The ro option once again tells to mount the CD-ROM read only, and the noauto command tells mount not to mount these file systems at boot time. (More comes further below.)
proc is a kernel information database that looks like a file system. For example /proc/cpuinfo is not any kind of file that actually exists on a disk somewhere. Try cat /proc/cpuinfo.
Many programs use /proc to get dynamic information on the status and configuration of your machine. More on this is discussed in Section 42.4.
The devpts file system is another pseudo file system that generates terminal master/slave pairs for programs. This is mostly of concern to developers.
You can mount the proc file system with the command
|
mount -t proc /proc /proc |
This is an exception to the normal
mount usage.
Note that all common LINUX installations require
/proc
to be mounted at boot time. The only times you will need this
command are for manual startup or when doing a
chroot.
(See page .)
A RAM device is a block device that can be used as a disk but really points to a physical area of RAM.
A loopback device is a block device that can be used as a disk but really points to an ordinary file somewhere.
If your imagination isn't already running wild, consider creating a floppy disk with file system, files and all, without actually having a floppy disk, and being able to dump this creation to floppy at any time with dd. You can also have a whole other LINUX system inside a 500 MB file on a Windows partition and boot into it--thus obviating having to repartition a Windows machine just to run LINUX. All this can be done with loopback and RAM devices.
The operations are quite trivial. To create an ext2 floppy inside a 1440 KB file, run:
5 |
dd if=/dev/zero of=~/file-floppy count=1440 bs=1024losetup /dev/loop0 ~/file-floppymke2fs /dev/loop0mkdir ~/mntmount /dev/loop0 ~/mntls -al ~/mnt |
When you are finished copying the files that you want into ~/mnt, merely run
|
umount ~/mntlosetup -d /dev/loop0 |
To dump the file system to a floppy, run
|
dd if=~/file-floppy of=/dev/fd0 count=1440 bs=1024 |
A similar procedure for RAM devices is
5 |
dd if=/dev/zero of=/dev/ram0 count=1440 bs=1024mke2fs /dev/ram0mkdir ~/mntmount /dev/ram0 ~/mntls -al ~/mnt |
When you are finished copying the files that you want into ~/mnt, merely run
|
umount ~/mnt |
To dump the file system to a floppy or file, respectively, run:
|
dd if=/dev/ram0 of=/dev/fd0 count=1440 bs=1024dd if=/dev/ram0 of=~/file-floppy count=1440 bs=1024 |
Another trick is to move your CD-ROM to a file for high-speed access. Here, we use a shortcut instead of the losetup command:
|
dd if=/dev/cdrom of=some_name.isomount -t iso9660 -o ro,loop=/dev/loop0 some_name.iso /cdrom |
A file system that is already mounted as read- only can be remounted as read- write, for example, with
|
mount -o rw,remount /dev/hda1 / |
This command is useful when you log in in single-user mode with no write access to your root partition.
The kernel caches write operations in memory for performance reasons. These flush (physically commit to the magnetic media) every so often, but you sometimes want to force a flush. This is done simply with
|
sync |
![\begin{figure}\begin{center}
\setlength{\unitlength}{0.00083333in}\begin{picture...
...8,3462){\makebox(0,0)[l]{\small Cylinder}}
\end{picture}\end{center}\end{figure}](img23.png)